Lean Product Design – A Must-Have Playbook for Digital Product People
Note: This article was updated in November 2025 to reflect AI Product Design
Creating a new product is an exciting process. You’ve dreamed up a killer idea, drafted some sketches and maybe even started to think about how you’d make money out of this world-beating idea.
But hold up. Before jumping in and hiring a development team, or asking IT to build it out, take a step back and make sure that you’ve thought it through, recognised your assumptions and proved that they are correct. Are customers really going to want this?
If the answer is no, the best time to find this out is now – the alternative is to find out after forking out a lot of money on coding an app that nobody wants. Fortunately, we can find this out with fast, cheap experiments, rather than paying for months of expensive development time.
That’s where discovery comes in. It’s a chance to explore our customers and their problems in-depth. Here we find out their ‘jobs to be done’, and run experiments to see if customers really will react to your product in the way you expect (spoiler alert: they won’t).
This guide gives you a heap of tactics that you can use to understand customer problems and test buying intent. This phase de-risks the whole venture since nobody; your investors, your board of Directors, your customers, your build partner, want to build something that nobody will use.
—
Throughout this guide I’ll be using a fictional product idea to give context to the concepts that I outline. I’ve used an example that is at a similar stage to the products that people approach us with at Browser: an idea for a new digital product where a little research has been done and a rough idea of the market and value proposition is known.
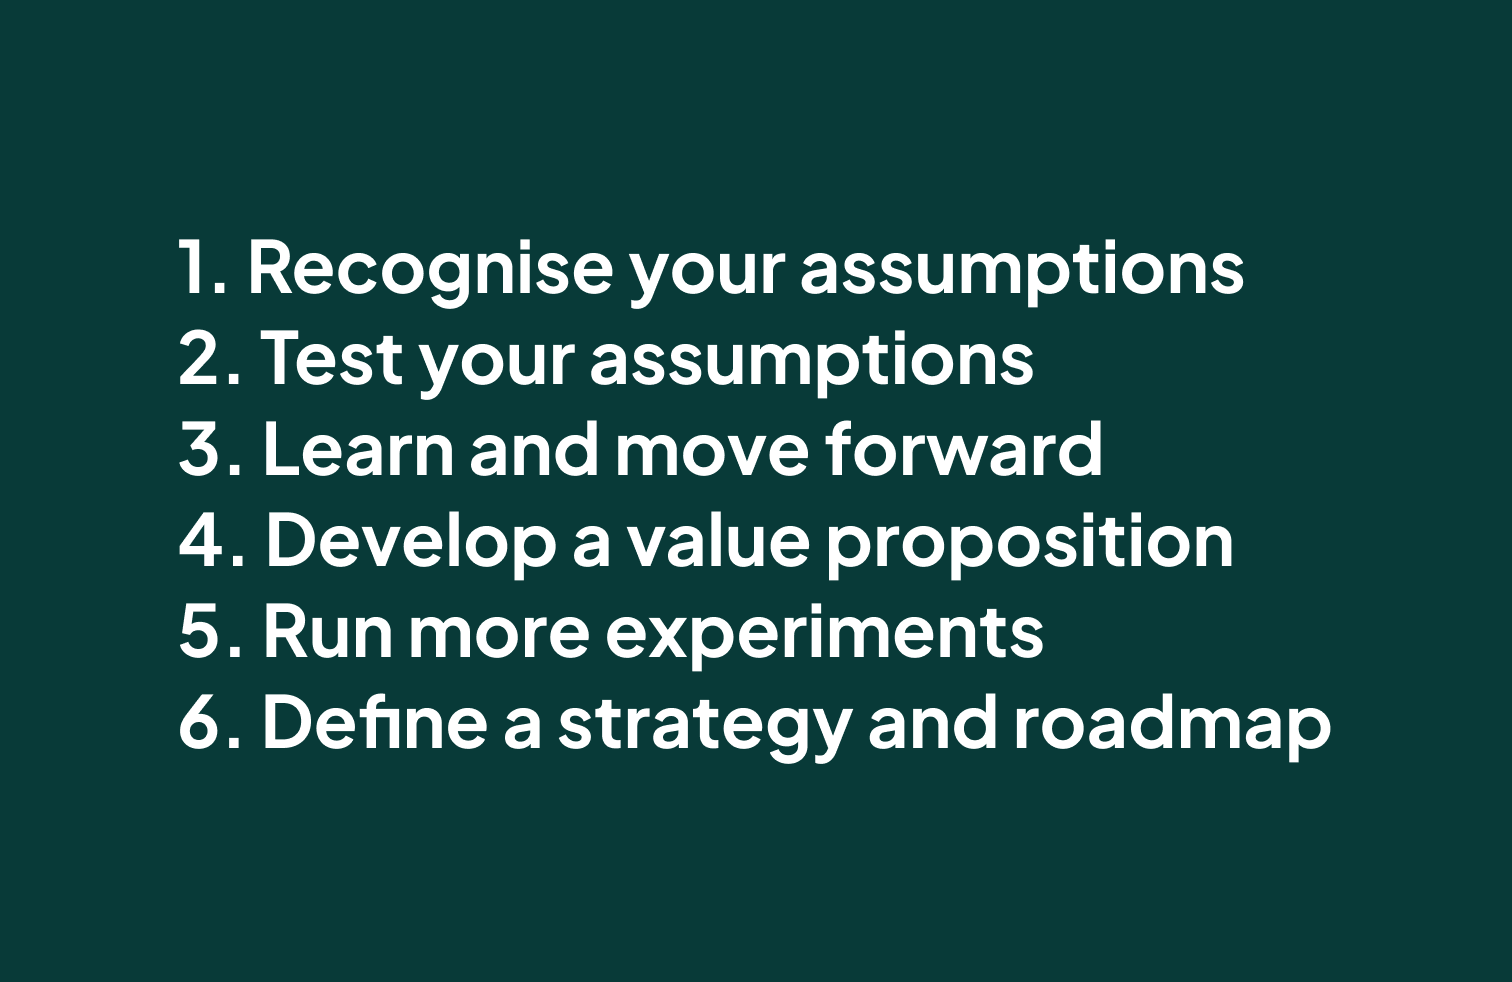
The steps we’ll run through in this guide are as follows:
Let’s jump in.
Setting the scene
Our product
The example product that I’m going to use is an idea for a product that helps busy people find personal assistants. As a working title, we’ll call it PA Finder.
That’s as much as we’ll define for the time being. At this stage, we don’t want to confine ourselves to a particular medium (an app, a physical product, a service). All we need is an idea for a problem and the kind of people that we believe are affected by it. Later, we’ll work out what the solution actually is.
So let’s imagine that we’ve already done a bit of research: we’ve spoken to some contacts who use a Personal Assistant, looked at existing competitors and have even lined up a few beta users who are keen to try out the first version of our product. It might sound like we’re ready to start designing and coding our product. After all, fail fast, right?
Staying in the problem space
Well, before we get carried away, Dan Olsen (author of the Lean Product Playbook) has something to say about this. He stresses that when creating a new product or feature, teams explore the ‘problem’ space rigorously, before moving to thinking about solutions. This helps us focus on benefits, not features, and thus on the value that we are delivering to the customer, rather than measuring value based on the features that we are delivering.
Since a solution is only valuable if we have first defined the problem/need correctly, for a large part of our discovery phase we want to stay in the problem space. The more we know about our customer’s problems, the more we de-risk all the work that comes with developing a solution.
This doesn’t mean that we’re moving slowly though, or that we’re wasting time working on theories and documentation. As this guide will demonstrate, we’ll be carrying out real life experiments to test customer reaction to the problems we assume they have. Some of this is familiar tools like interviews and surveys, and we’ll also use techniques like dummy landing pages and ad campaigns to test buying intent.
With this in mind, the focus of this guide will be the work done in taking a product back to the problem space, interrogating all the assumptions that we have made about our customers, market and our ability, before emerging again into the solution space with a bunch of evidence to back up what we plan to build.
That brings us neatly to the next chapter, Recognise your assumptions.
Step 1. Recognise your assumptions
You might have already jumped ahead and already started sketching out how your new product might look and work. That might come in handy later, but I strongly advise you forget about that for now and work through this step which focuses problems and solutions from a customer point of view.
Before you start dreaming up solutions, putting pen to paper and hiring a team of coders, you need to understand the pains, gains and customer jobs of your product. At this stage we will search out the assumptions we are making, phrase them as hypotheses and then single out the ones that will make or break our business if they are incorrect.
If you spend the time to do this, you’ll be on your way to creating a testable value proposition that will become the north star for your design, development and marketing. A proven truth that everyone can work towards. If you don’t, you are in danger of building features on a hunch that they are a good idea – a recipe for wasted time and money and a team that is pulling in different directions.
Customer jobs, pains and gains
Our starting point then, is with our customers.
We’ll map out our customers’ pains, gains and customer jobs based on what we know so far. Depending on the amount of research that has already been carried out beforehand, there might be an element of guessing at this stage, but the idea is that we get everything that we think we know about our customers out in the open.
In our workshops, we use the below chart to map this out (inspired by Strategyzer). We’ve applied our example product, Personal Assistant Finder, to this test to give you an idea of how it might look
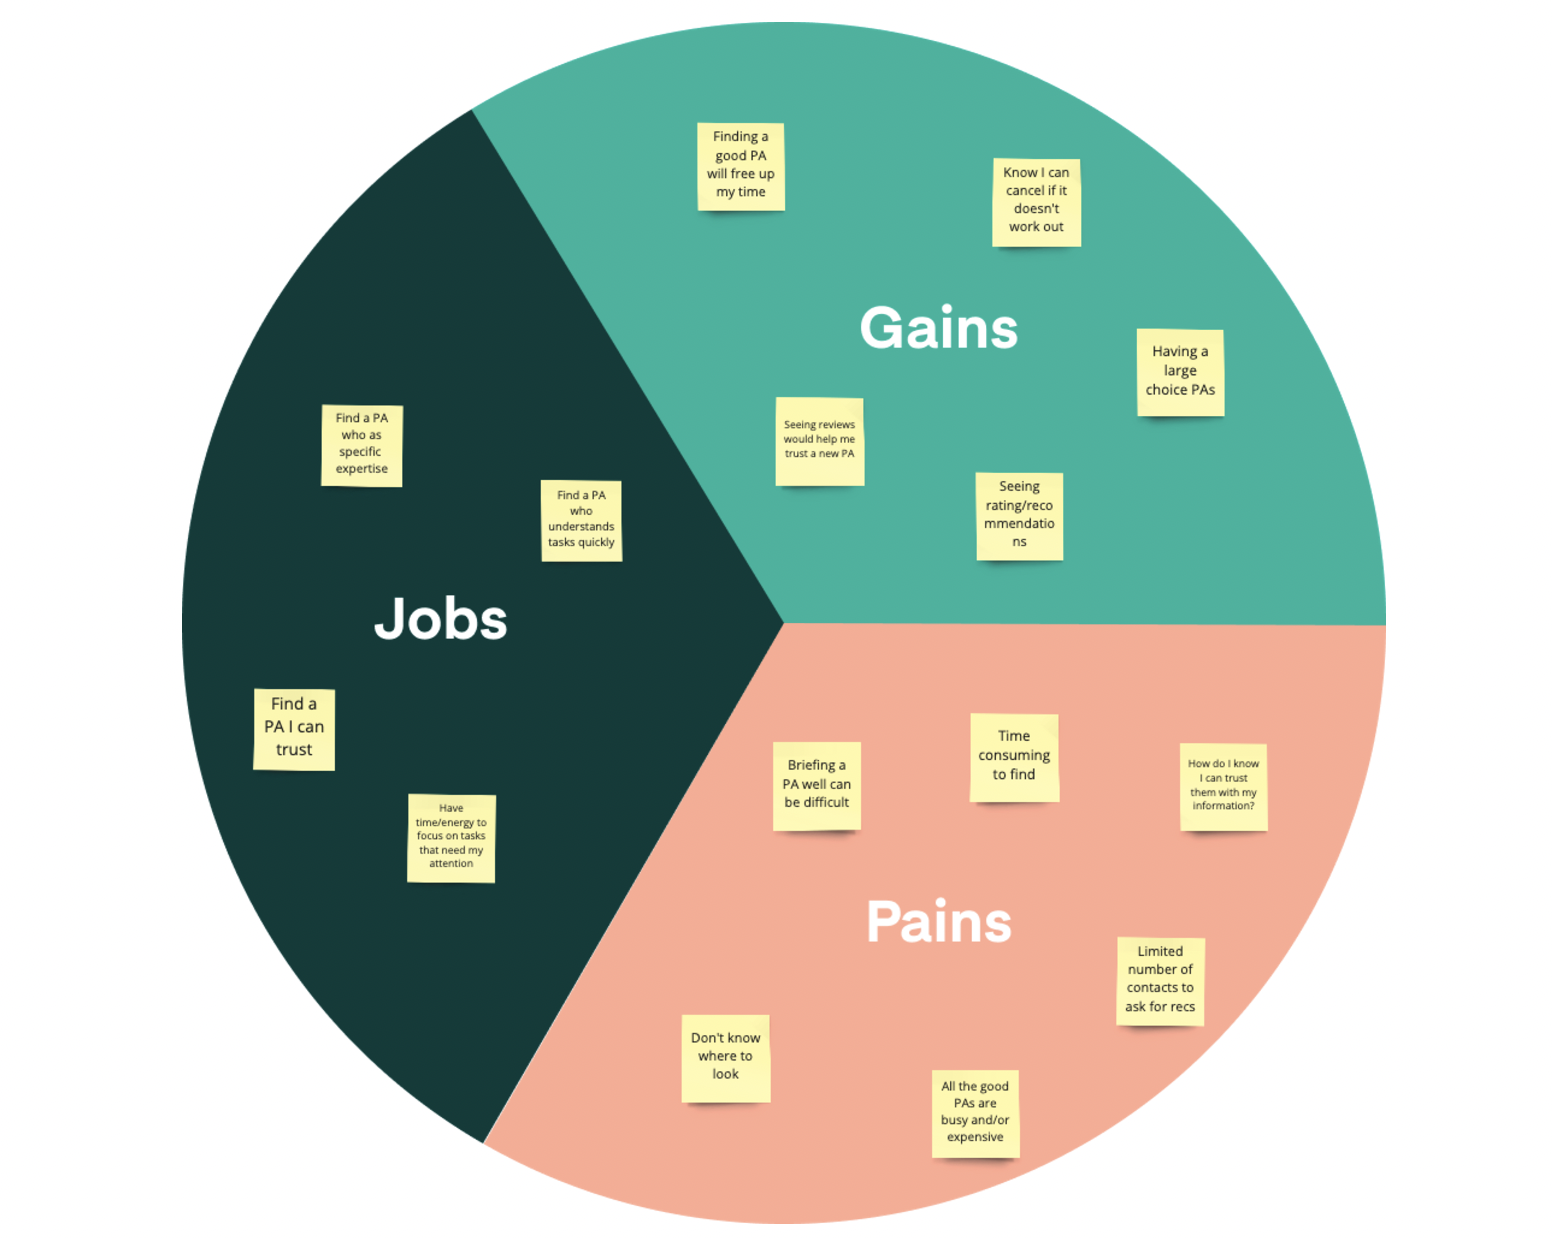
Let’s break these terms down.
Customer jobs: What are the tasks that our customers need to do?
Pains: What are their pain points they encounter when carrying out these jobs?
Gains: What opportunities exist for them to make gains on their jobs?
Once we’ve mapped this out we have a clear view of what we think our customer wants to achieve, the problems they have and the opportunities to improve. This might be based on some prior research, but it’s also okay if there is an element of guessing here – we’ll be testing it all in a moment.
Assumption Mapping
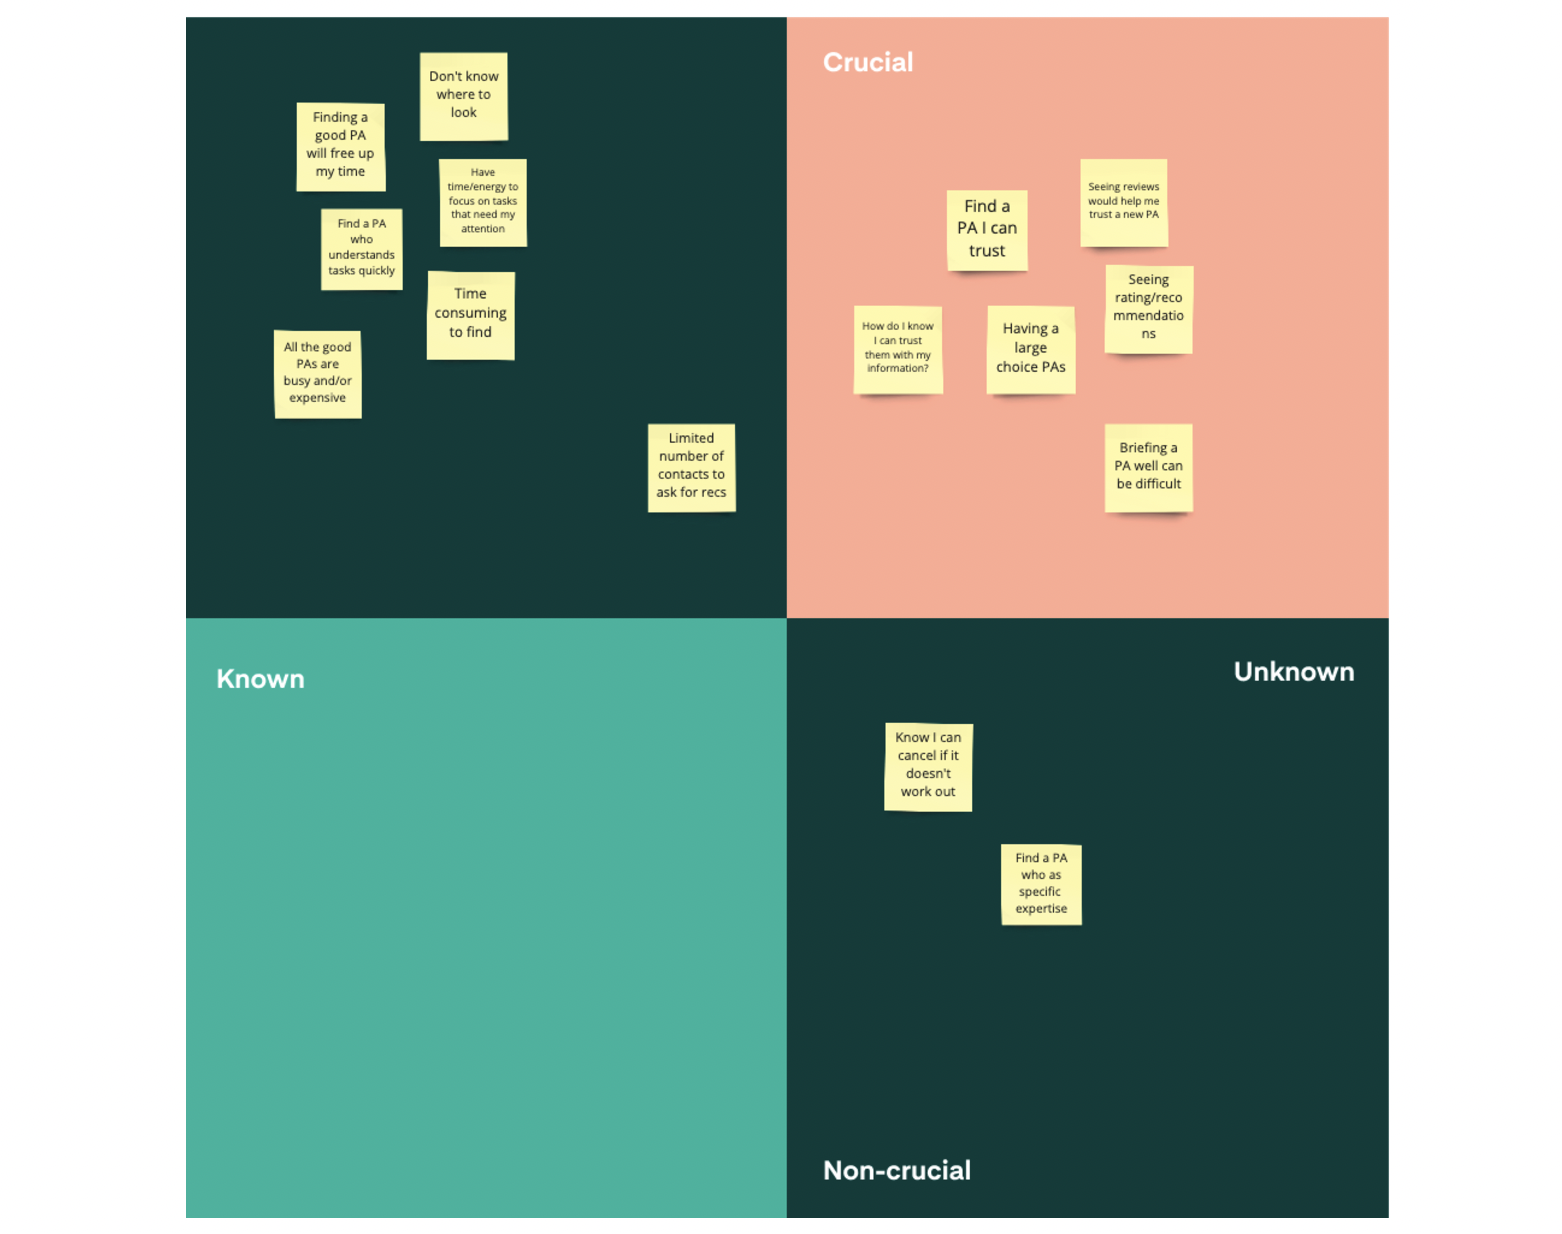
Our next step is all about acknowledging how little we know. Whilst guessing is fine at this stage, it is important that we acknowledge what is a guess, and what is backed up by solid evidence. Assumption mapping helps us do this.
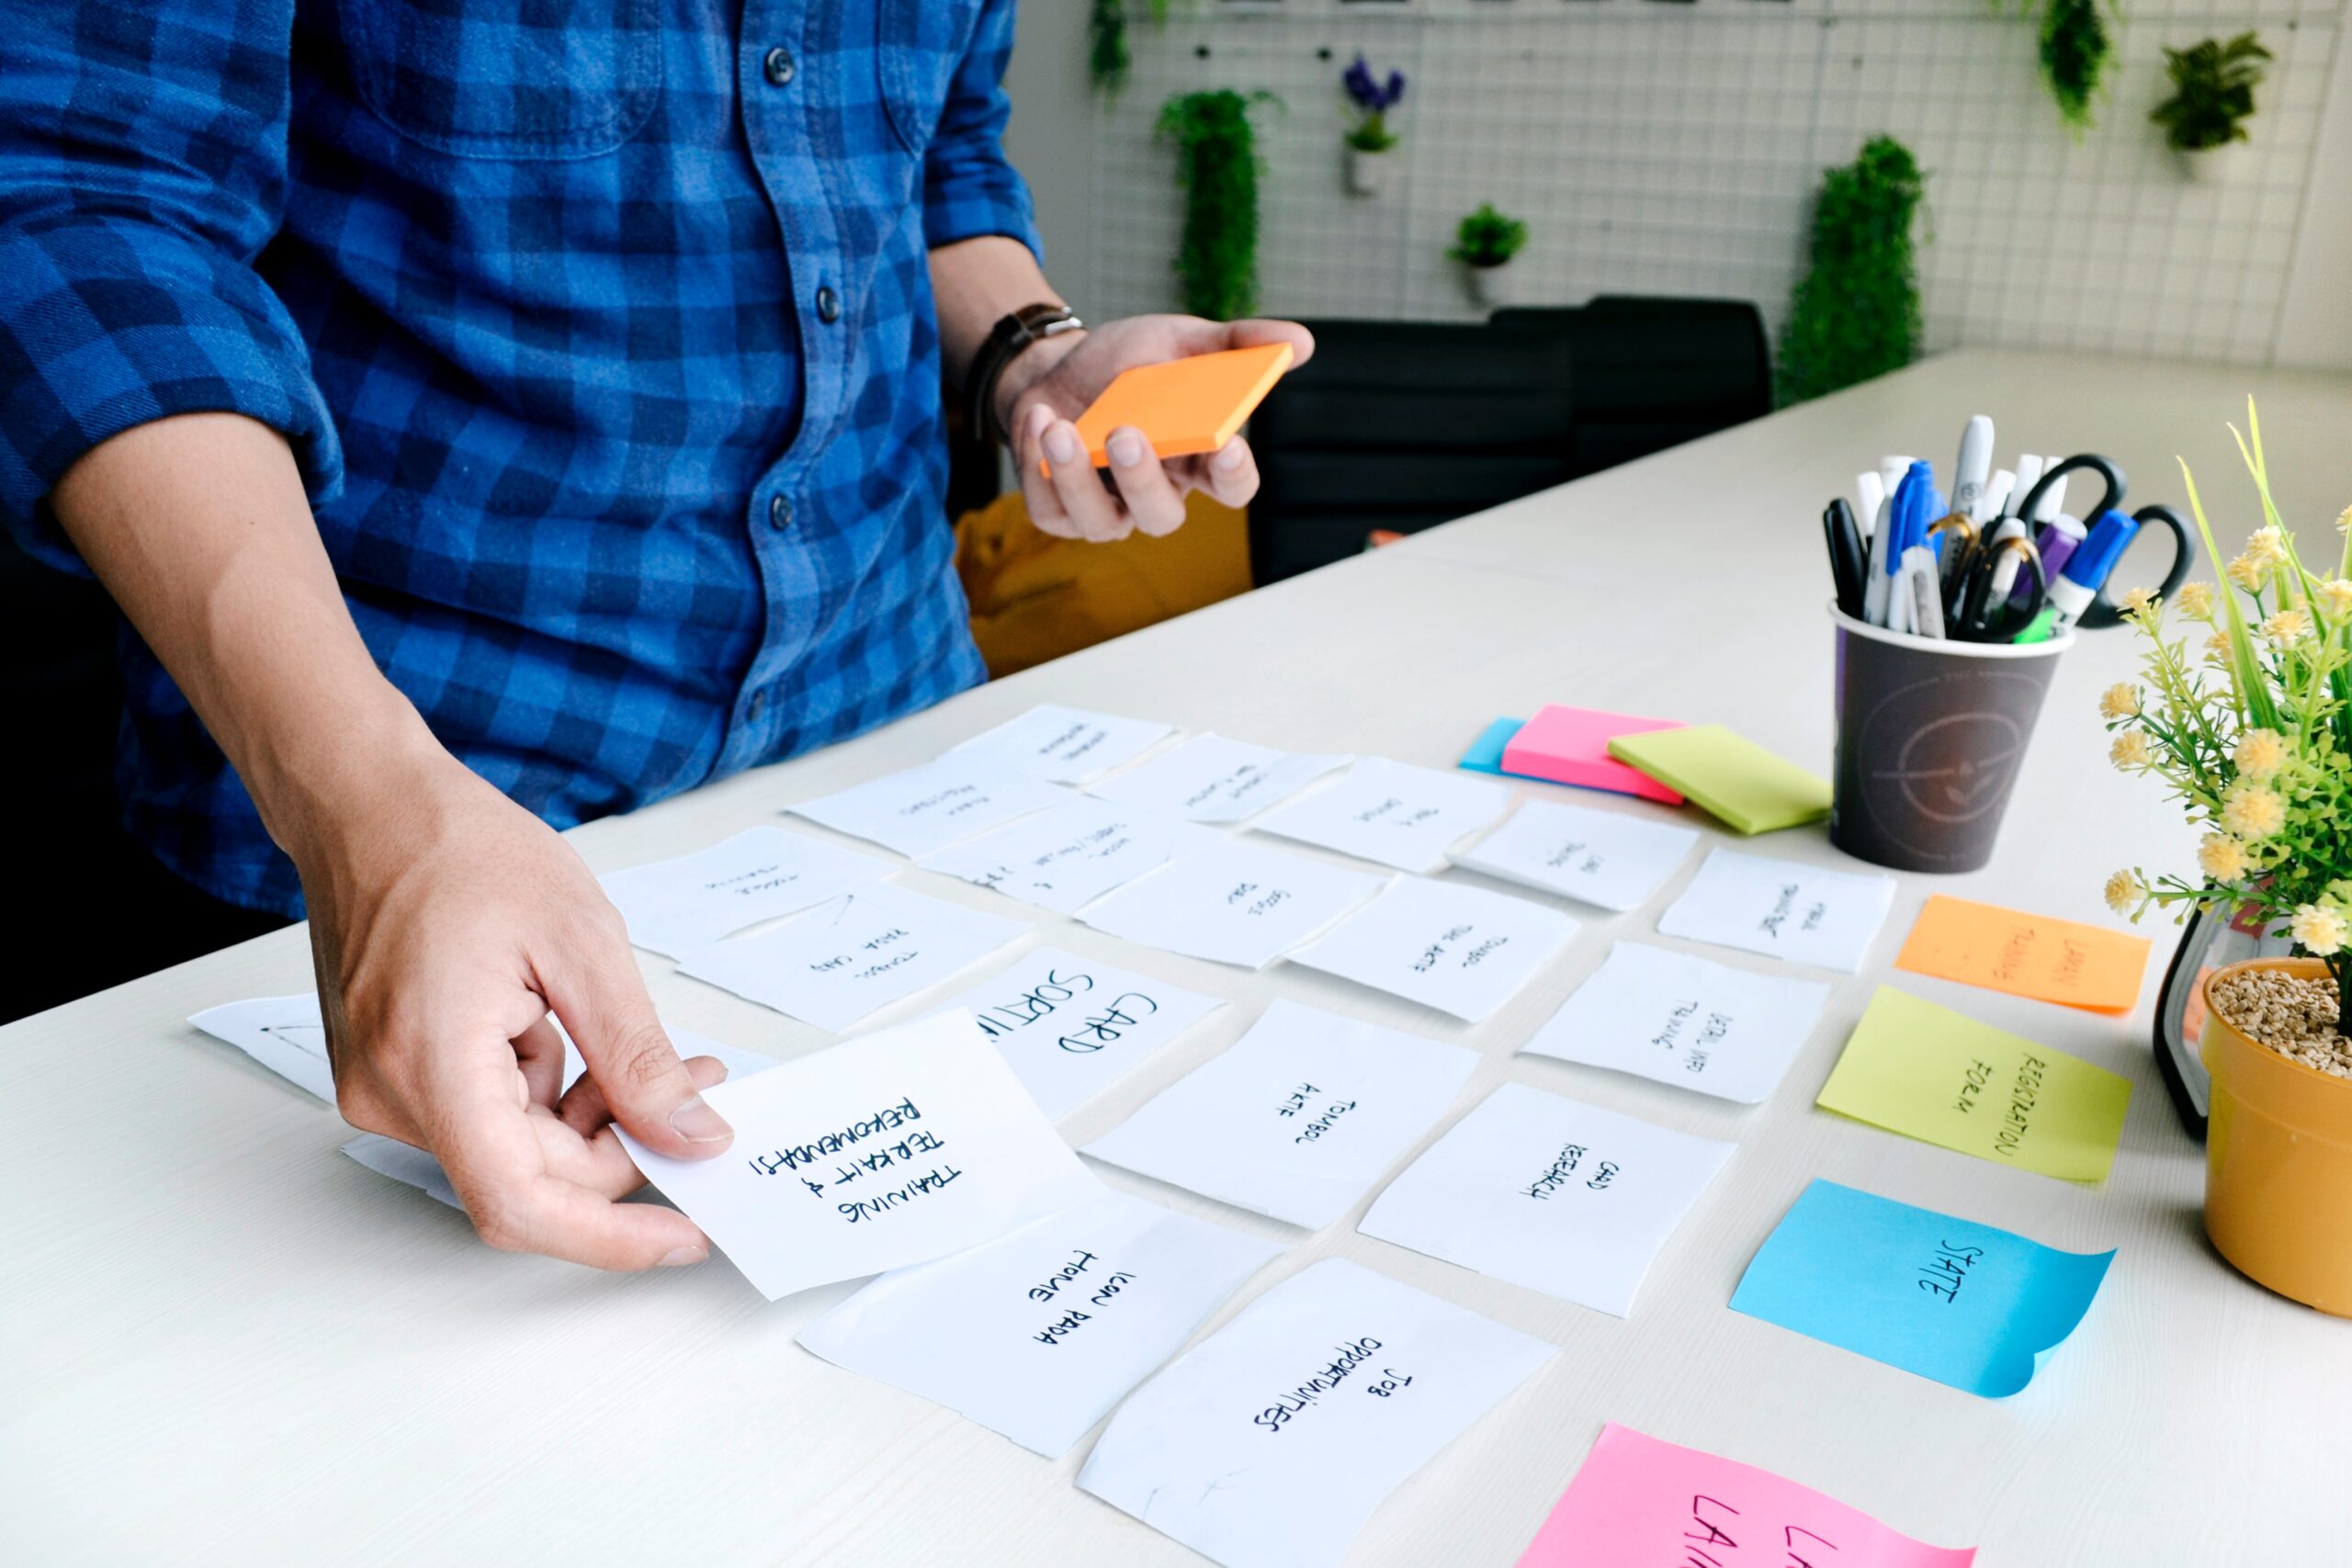
Here we’ll plot what we think we know onto a grid and map our post-its by evidence vs. business importance. Below you can see how we have done this with our Personal Assistant product: we’ve taken post-its that we’ve identified in the pains, gains and jobs exercise, and applied them to our Assumptions Map to understand which of these are risky assumptions.
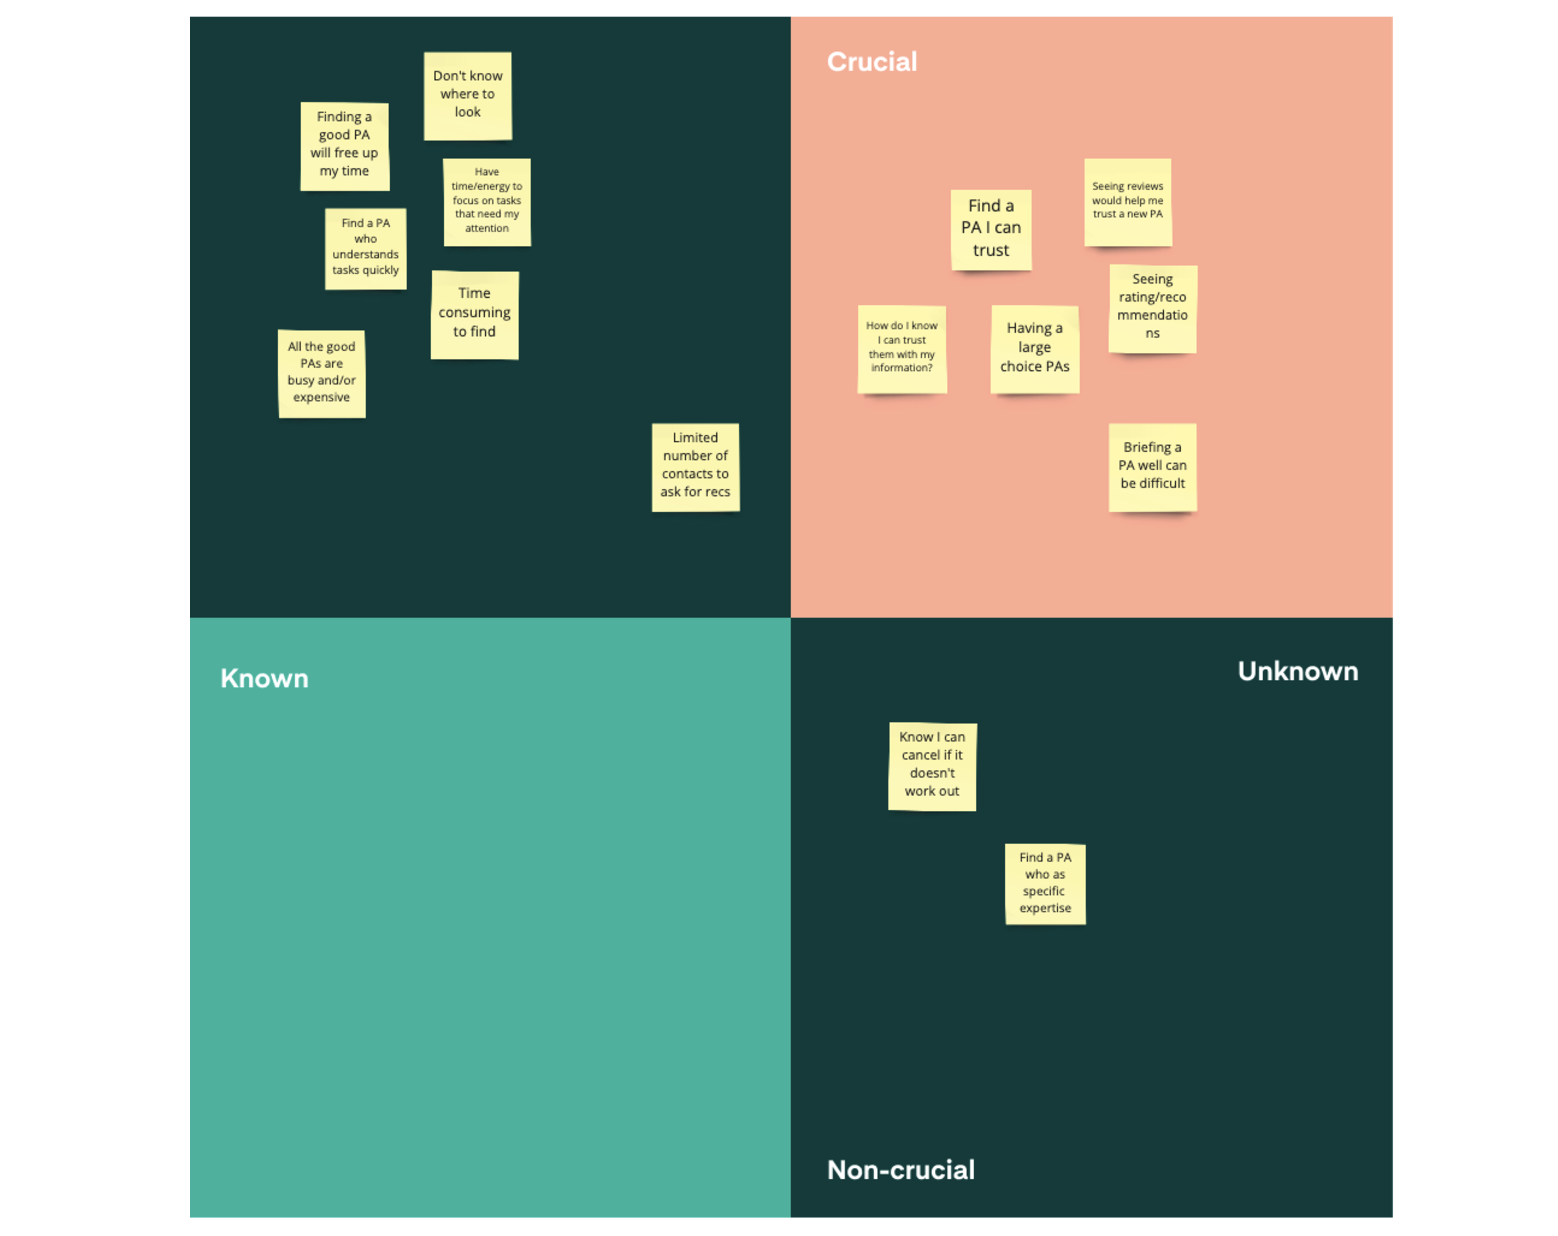
Here you can see a group of post-its in the top right hand quadrant. As the label suggests, these are our high risk items – we haven’t proved them and the product won’t work if they are incorrect. These are the things that we’ll test first.
When assessing whether we have evidence, it’s easy to overstate the evidence that we have. Anecdotal evidence, competitor research or interviews are a good start, but they aren’t strong evidence and shouldn’t be treated as such.
Strong evidence, such as users actually buying a version of our product, or at least signalling intent by signing up to a wait list, are indicators that we can really take seriously. They do take more investment in time however, so we’ll be working our way up to these kinds of experiments in the later steps.
Once we’ve mapped this out, we move to the next stage of our process – Test your assumptions.
Step 2. Test your assumptions
Once we’ve mapped out what we think we know about our customers, it’s time to run some tests.
In the early stages of our process, we’ll use exploratory methods to prove or disprove our hypotheses. These tests focus on finding customer problems, rather than jumping to solutions. They will be one or a number of:
- Customer interviews (with a focus on jobs to be done)
- Expert interviews (with stakeholders, subject matter experts, frontline staff)
- Analysing search trends (are people searching about this problem?)
- Shadowing (observing how people act and what problems they face)
- Reading discussion forums (are people talking about this problem?)
- Surveys (how do people respond when we ask about this problem area?)
- Watching customers using existing products (what issues and limitations do they run into?)
Where possible, the whole team should be involved in this process. For us that typically means a designer, a tech lead, a product lead and one or two people from your team. Making sure that all we include a tech person in this early research so that they can see and hear the real world problems that our product will tackle. This helps them make better decisions when it comes to eventually building the product, and also they’ll have some great ideas when it comes to dreaming up solutions.

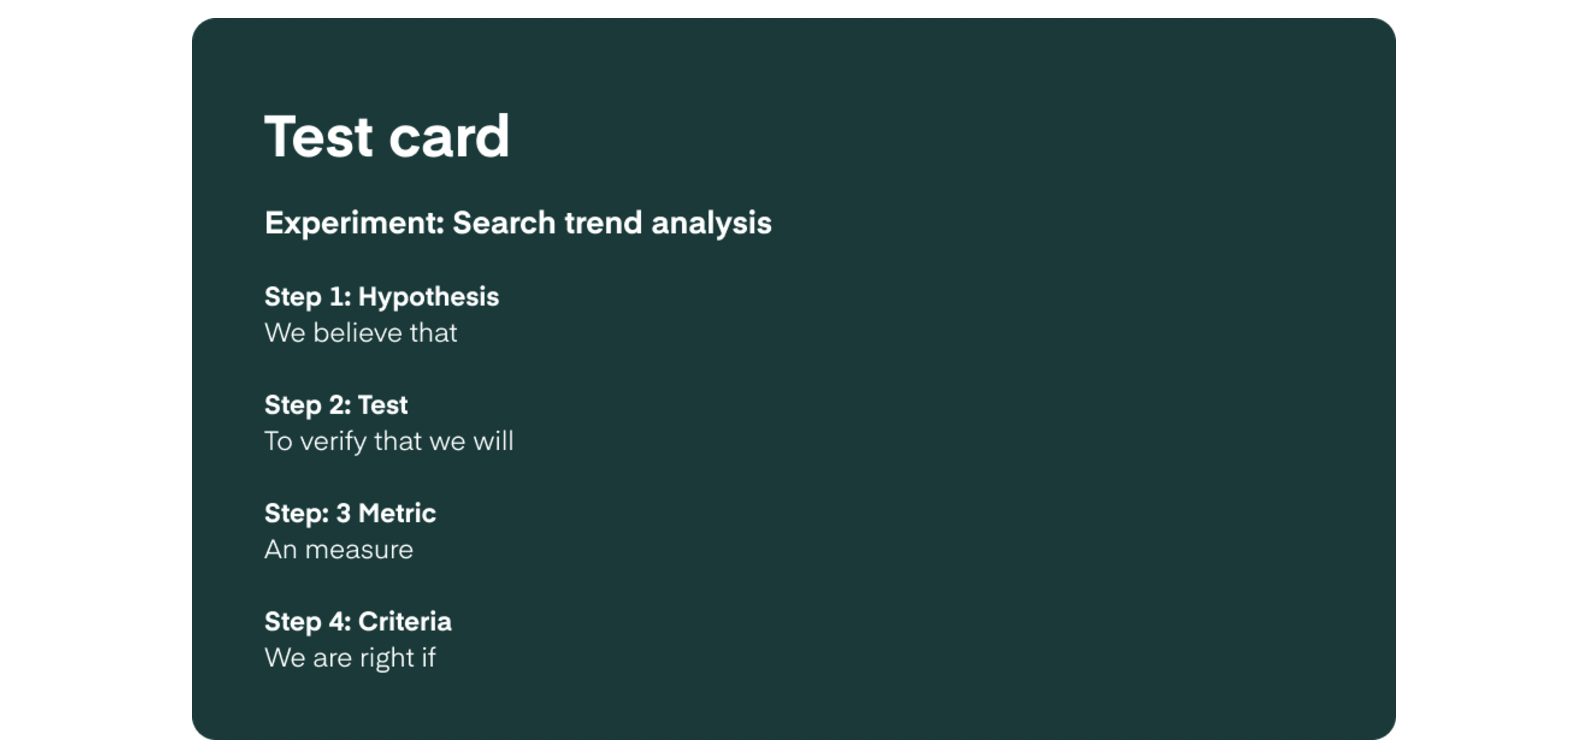
Planning experiments using test cards
A typical test card will look like the below. It shows what we are testing, how we will test it, what we will measure and what success looks like. We will often create multiple tests for each hypothesis, to make sure that these key assumptions are backed up with maximum evidence. This is an example from a hypothetical quiz app to find a personal assistant.
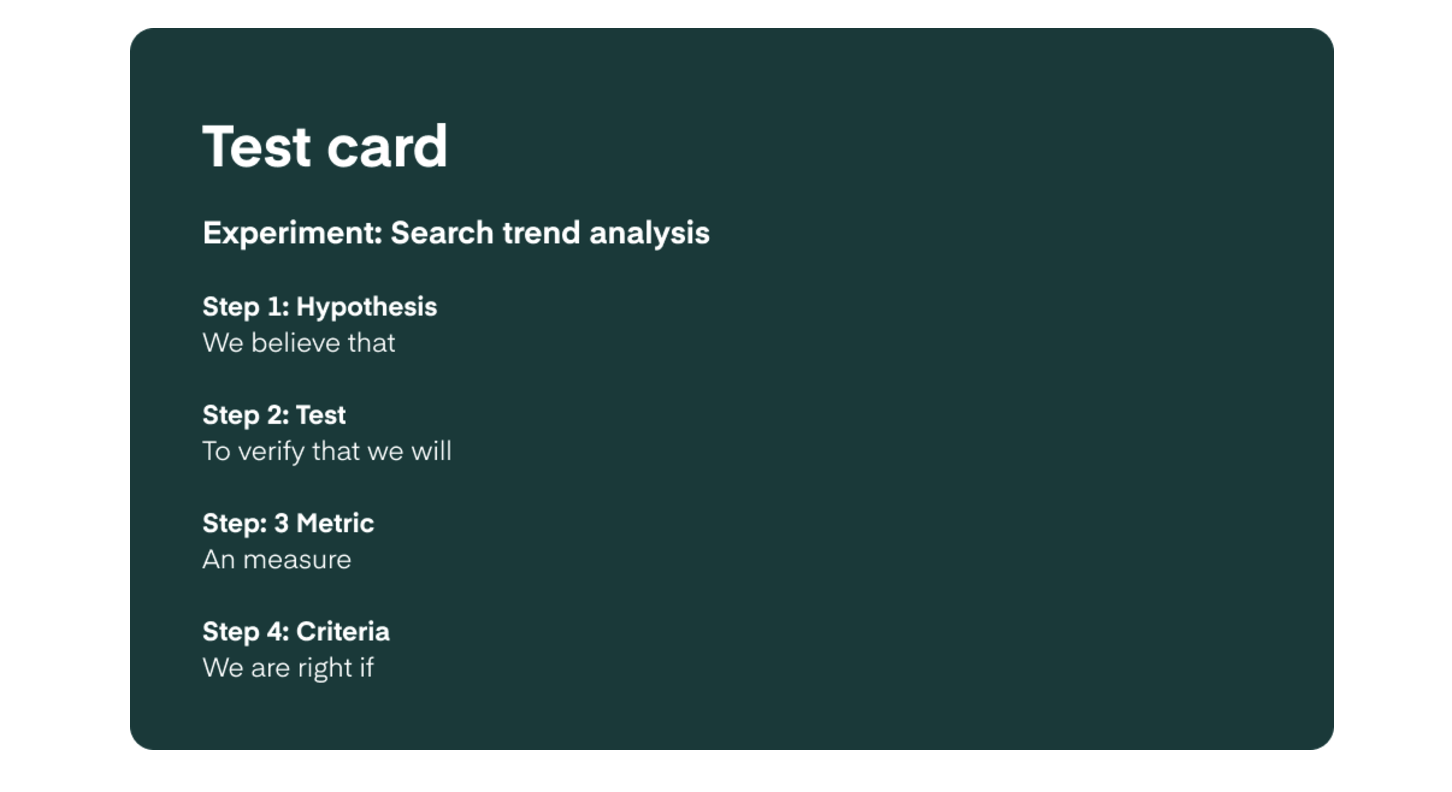
The card contains 4 key points to keep us on track:
Hypothesis
Taken from our assumptions map, this is the thing that we want more evidence to be sure that it is true. We’ll tackle our ‘Unknown’ and ‘Critical’ hypotheses as a priority.
Test – Describes what the test will consist of and the actions that we will take during it.
Metric – Documents what we will be measuring during the test.
Criteria – Tells us what the threshold for a positive result is. We define this before the test begins.
We’ll run through what we do with the results of these cards in the next section, Learn and move forward.
Step 3. Learn and move forward
Great! By this point we have identified our most risky assumptions, ran some experiments on them and collected a bunch of data about them that will help us decide if they are valid or not.
But it’s not enough to just conduct experiments, jot down some findings and pat ourselves on the back. We need to take action from each and every one of them if we are going to squeeze all the value we can from them.
A good way to document them is by splitting the results into a card that contains four sections: ‘We believed that’, ‘We observed’, ‘From that we learned that’, ‘Therefore we will’. Using our running example of our PA Finder, this would look like the following:
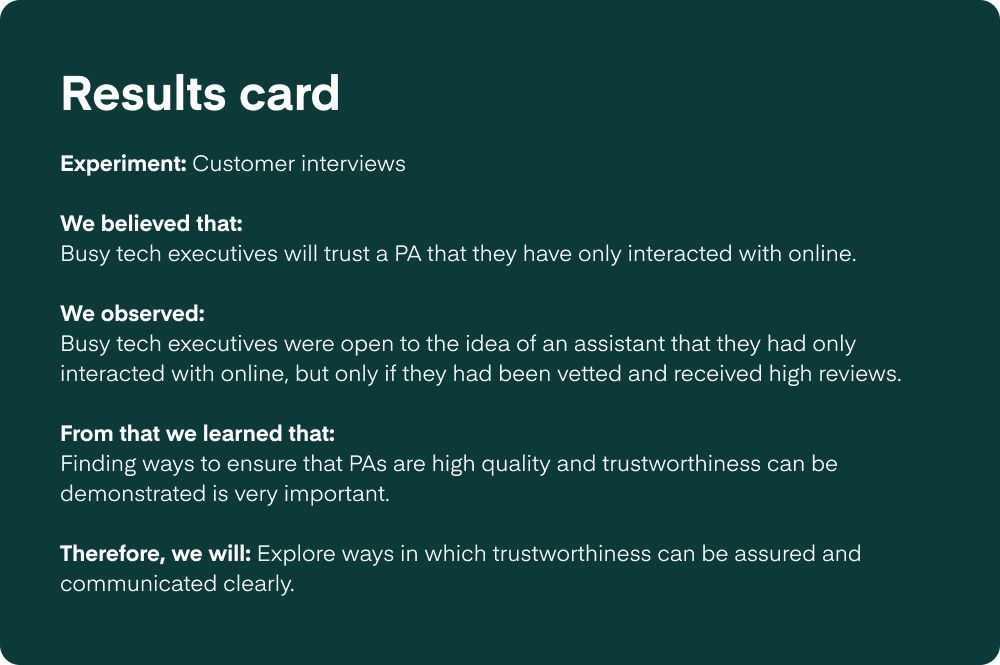
Whilst in the above example we’ve decided that the next course of action is to run some further experiments, it’s worth noting that we could take a few different routes:
- If the experiment was deemed to indicate that the hypothesis was true, we might decide to move forward with another, more time consuming but more reliable, experiment (such as a high fidelity prototype or a landing page)
- If the experiment was deemed inconclusive, we might repeat it, or look to other experiments that we have run or will run to see if they provide evidence either way.
- If the experiment was deemed to indicate that the hypothesis was incorrect and the experiments that we have run also point to this, we’ll accept this finding and rework our value proposition and/or business model to reflect this.
Advantages of documenting our findings in this way
- Keeping track of what we’ve learnt – we’ll be doing lots of experiments and we will want to refer back to them. These cards are easy to find and reference later.
- Structuring the way we think about results. The above approach makes sure that we’ve considered what we set out to learn, what we did learn and what we will do next.
- Getting everyone’s buy-in. The team will need to agree on these points, so it’s a great way of keeping everyone aligned to the evidence that we are gathering and the conclusions that we are drawing.
- Fast documentation – we don’t need to write a full on document, just jot down the key findings and move on.

Step 4. Develop a value proposition
By this stage we’ve assessed what we thought we knew about our customers, highlighted the things that we don’t have evidence of and will cause us serious issues if they are wrong, and methodically gone about testing them through experiments such as customer interviews, search volumes, competitor research and more.
We should now be confident enough to start moving into the solution space by creating a value proposition based on this evidence. From this, we’ll then map out our business model before picking this apart for more risky assumptions.
Creating a value proposition
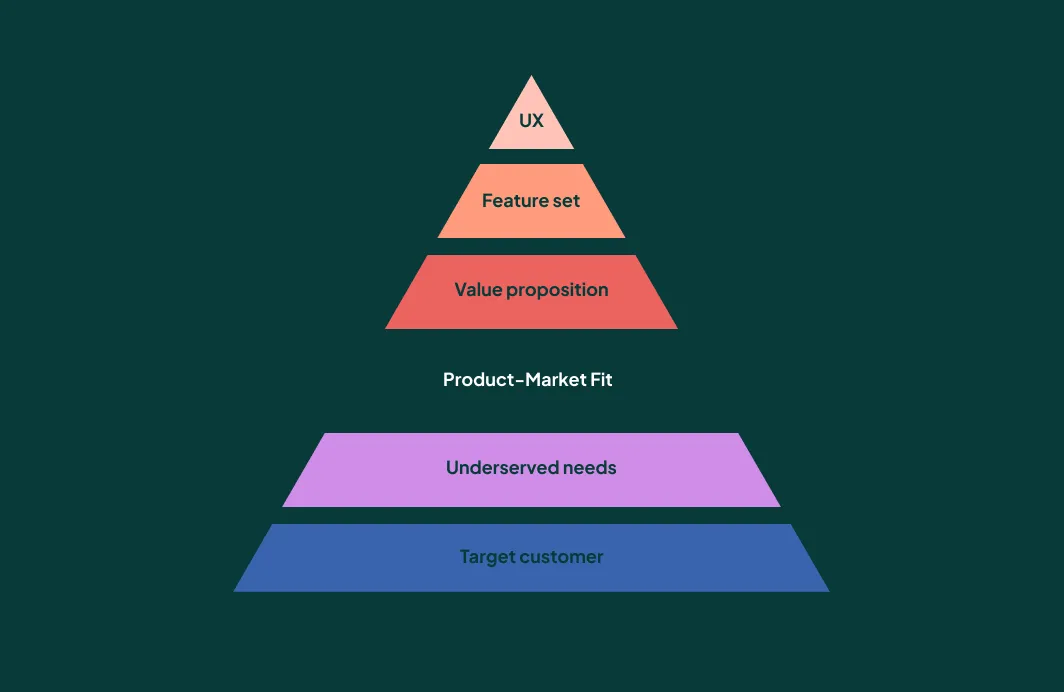
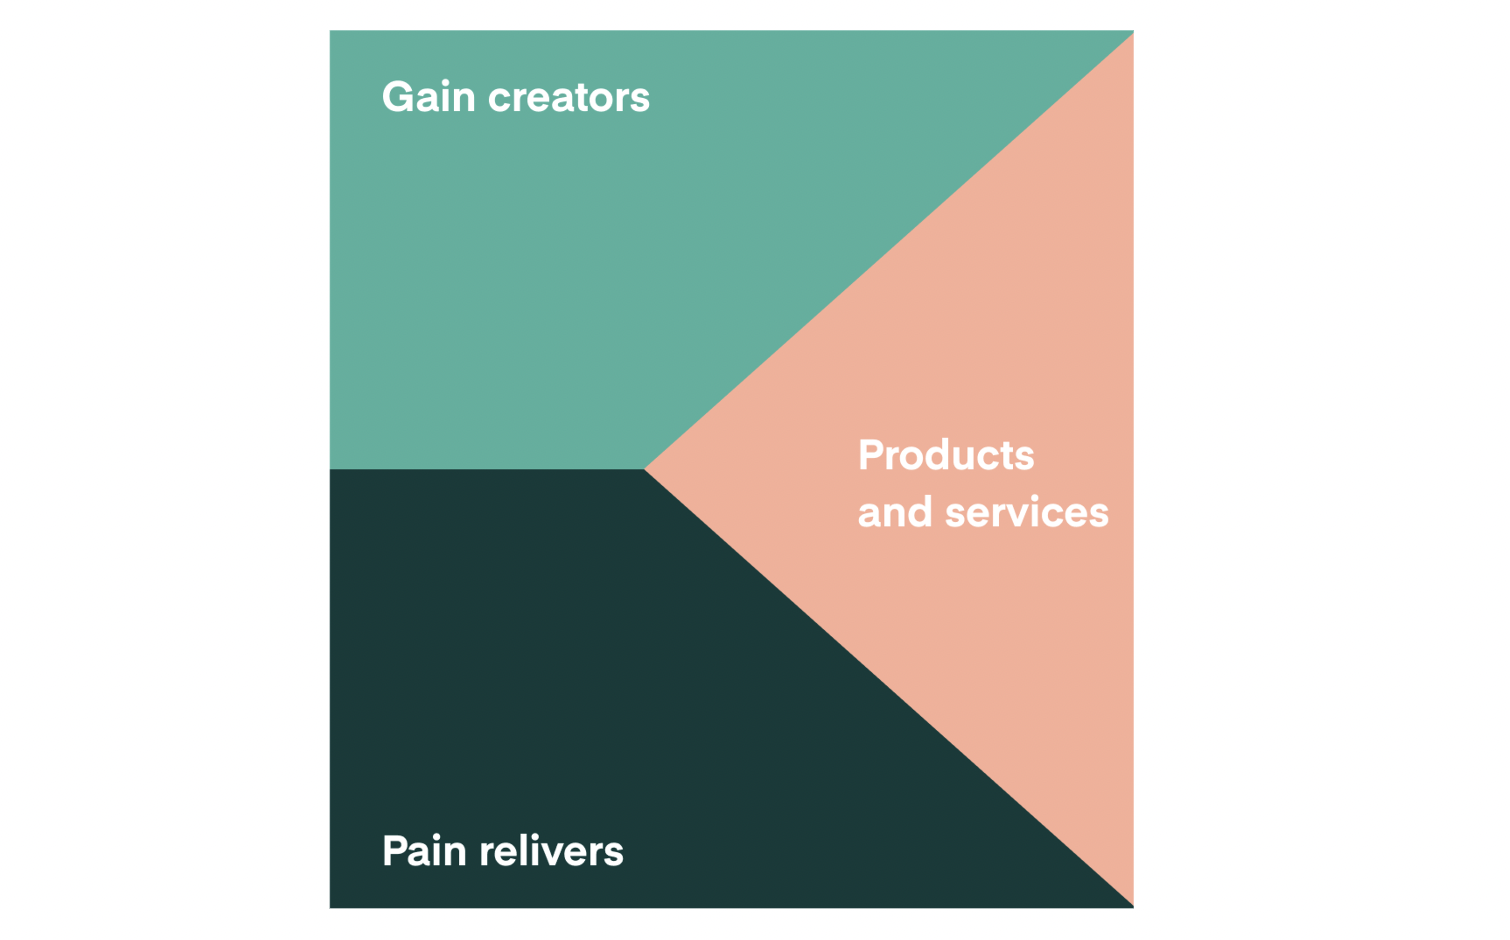
We’ll map out our gain creators, pain relievers and finally the products and services that we could offer. If we’re on to a winning value proposition, these should match up nicely to our user pains, gains and jobs to be done. If they fit together well, in theory, we’re looking at a good product market fit.
Once we’re happy with our value proposition, we’ll start to map out our business model. At this point we should still be very aware that we’re still dealing with a lot of assumptions. That’s okay, We’re going to do some more assumption mapping at the end of this step.
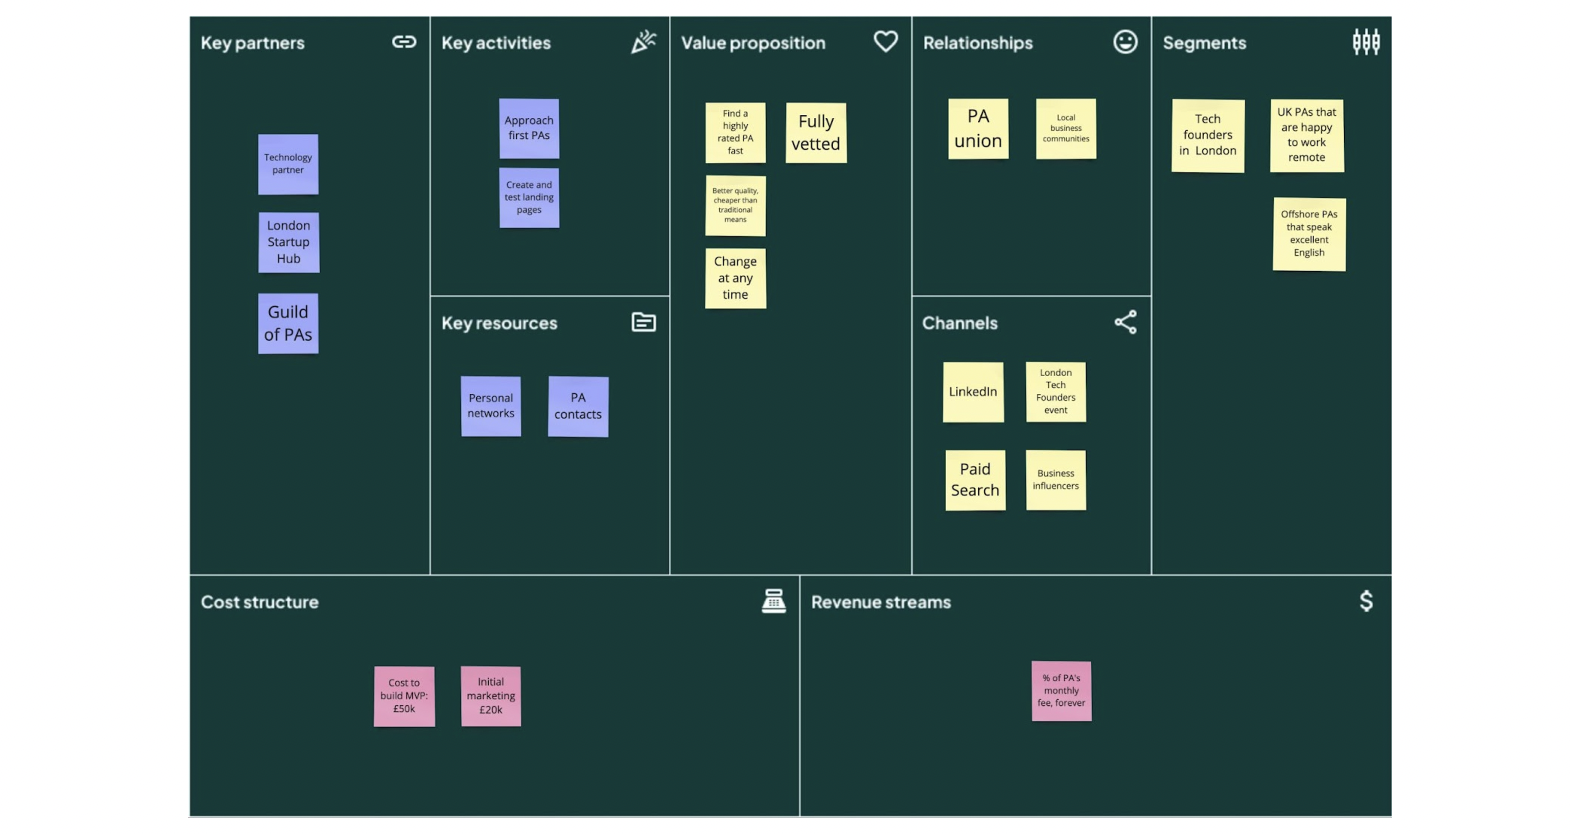
The Business Model Canvas looks like this:
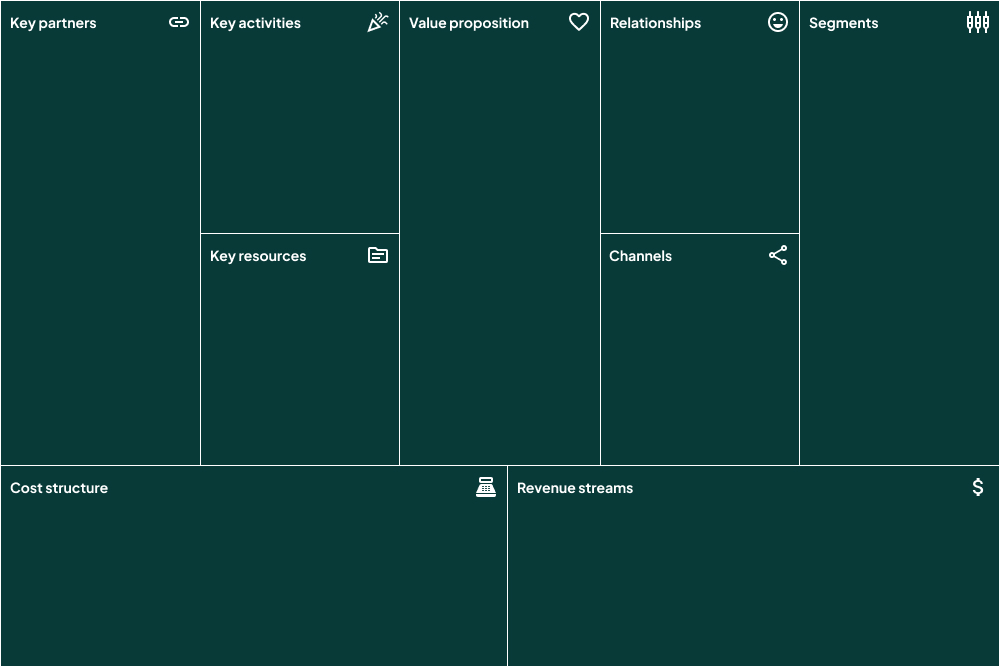
Original concept: https://www.strategyzer.com/canvas
On it, we map out the core parts of our proposed business model. These are sorted into the following groups:
Desirability (do people need our product?)
- Key propositions
- Customers relationships
- Channels
- Customer segments
Feasibility (can we build our product?)
- Key partners
- Key activities
- Key resources
Validity (is our product commercially viable?)
- Cost structure
- Revenue streams
The Business Model Canvas is a powerful way to find any gaps in the business model that have been overlooked. It’s also a strong tool to get the whole team aligned about what it is that we’re offering our customers, how we’ll deliver it and where the money is going to come from.
Once this is done, we’ll move on to assumption mapping again. We’ll take everything that makes up our business model and interrogate it to work out what is crucial and still has little evidence backing it up.
Step 5. Run more experiments
Once we’ve mapped the assumptions made in our business plan, we’re ready to run even more experiments. Now that we’ve already tested some of the assumptions that we’ve had around our users, these experiments will be more complex and take longer to produce. They might be one of the following:
- A simple landing page – creating a marketing page, driving traffic to it and measuring the conversion rate
- A clickable prototype – creating a clickable prototype, giving test users a scenario to work through and observing how they get on
- A low-code product – creating a working product, but using tools like Webflow or Bubble to produce something that simulates your product idea
- A single feature MVP – creating a coded product, but focusing on a single feature or assumption that we’d like to test
In many instances, a design sprint is a good way to approach this part of the product development process. It is a 4 or 5 day period where we define what we want to test, come up with a range of imaginative solutions, create a high fidelity, clickable prototype (of a landing page, or key part of the product itself) and test it out with a small number of customers. It is a great way of making decisions quickly and rapidly testing ideas.
Whatever approach is taken, what’s important at this stage is that we test the most risky and important assumptions on our business canvas first, prioritising those that fall in the ‘desirable’ category over anything else. After all, if nobody is willing to buy our product because we’ve haven’t solved their problems in a compelling way, we need to find that out and make a pivot before we go any further.
As in steps 2 and 3, we’ll create test cards to document exactly what we want to test here, and what success looks like. For example, if we build a landing page, we might want to test for buying intent and consider 50 enquiries in 1 week a success.
Step 6. Define a strategy and roadmap
From all of the work that we have done in the previous steps, we are now ready to define a product strategy. A good product strategy should describe what your product hopes to accomplish and how you plan to do it. It will be a document that any team member can look at and understand what the big picture is and make decisions, like what features to build, based on it.
Remember that business model canvas that we produced in step 4? Well, that’s a great start for our product strategy. It documents how our product will be outwardly desirable, technically viable and financially feasible – three aspects a good product strategy should cover.
To keep us from getting bogged down in documentation, we’ll simply update our canvas based on what we’ve learned during our previous experiments and use it as our product strategy. If needed, we can document this in a deck so that it’s presentable to stakeholders and the delivery team, to make sure that everyone is on the same page.
AI in Lean Product Design: What Changes (and What Doesn’t)
If you’re considering AI as part of your product solution, the core principles of lean product design remain unchanged. You still need to understand your customers’ problems before jumping to solutions. You still need to test assumptions. The difference is that AI introduces a whole new layer of assumptions that need interrogating, probing and defining.
The most common mistake we see is teams bolting AI features onto existing products without understanding if their users actually want or need them. This ‘AI-ification’ trend has led to bloated products where AI becomes a solution looking for a problem, rather than a thoughtful response to user needs. Remember: we’re designing for user problems, not for the sake of using trendy technology.
New assumptions to test
When AI enters your value proposition, you need to add these questions to your assumptions map:
Do users trust AI to handle this task? According to recent studies, only 46% of people globally are willing to trust AI systems, despite 66% using AI regularly. This trust gap is critical. If your PA Finder app relies on AI to match users with assistants, you need to prove that users will trust an algorithm with this decision. An interview where someone says ‘that sounds interesting’ isn’t enough. You need to test actual behaviour.
Does conversational UI actually serve your users better? Natural language interfaces sound intuitive, but they remove the visual scaffolding that helps users understand what’s possible. If your PA Finder becomes a chatbot instead of a traditional form, you might be trading clarity for novelty. Test whether users can actually accomplish their jobs more effectively with conversation, or if they’re just being polite during your interviews.
What happens when the AI gets it wrong? In your experiments, deliberately introduce errors. Show users results that are 80% right, or responses that don’t quite answer their question. How do they react? Can they recover? Your product needs to handle the reality that AI systems can hallucinate or produce incorrect outputs up to 27% of the time.
Testing AI value propositions
Your test cards for AI features need to be more rigorous. A standard landing page test might show interest, but it won’t tell you if users will actually rely on AI outputs in practice. Consider these experimental approaches:
Run a Wizard of Oz test where humans simulate the AI. This lets you test the interaction pattern before building any AI capability. For PA Finder, you could have team members manually generate matches based on the criteria users provide, responding as if it’s automated. You’ll learn whether the AI interaction model works before investing in the technology.
Create a low-fidelity prototype that deliberately shows AI uncertainty. Instead of confident recommendations, show probability scores or multiple options. Does this transparency build trust or create confusion?
Test with real errors. Show users imperfect results during interviews. Their reaction to failure cases is often more revealing than their reaction to success cases.
What stays the same
Despite these new considerations, the fundamentals don’t change. You still need to stay in the problem space longer than feels comfortable. You still need to map assumptions and test the risky ones first. You still need to resist the urge to jump straight into building.
The temptation with AI is to assume the technology itself is the value proposition. It isn’t. The value comes from solving user problems better than existing alternatives. If you can’t articulate that value without mentioning ‘AI’ or ‘machine learning’, you probably haven’t defined your value proposition clearly enough.
Treat AI as you would any other technical approach: useful in some contexts, unnecessary in others. Your job is to prove which category your product falls into before you commit to building it.
The product roadmap
Once our strategy and objectives are agreed on, we’re ready to start planning our next experiments. All that’s left is to define what we’re going to focus on first. This is where a roadmap can help.
We can create a roadmap quickly from what we’ve mapped on our business model canvas and assumptions grid. Our roadmap is simply a document that ranks hypotheses in priority order and shows what we’re going to investigate and deliver next.
A Next Now Later roadmap is an excellent way to do this. It focuses the team and stakeholders on what is the most important thing to do right now and it is designed to resist the situation where the roadmap simply becomes a feature list that the delivery team works from. Instead, we frame our product as a series of hypotheses that need to be investigated, and add detail to them as they move to the ‘Now’ column.
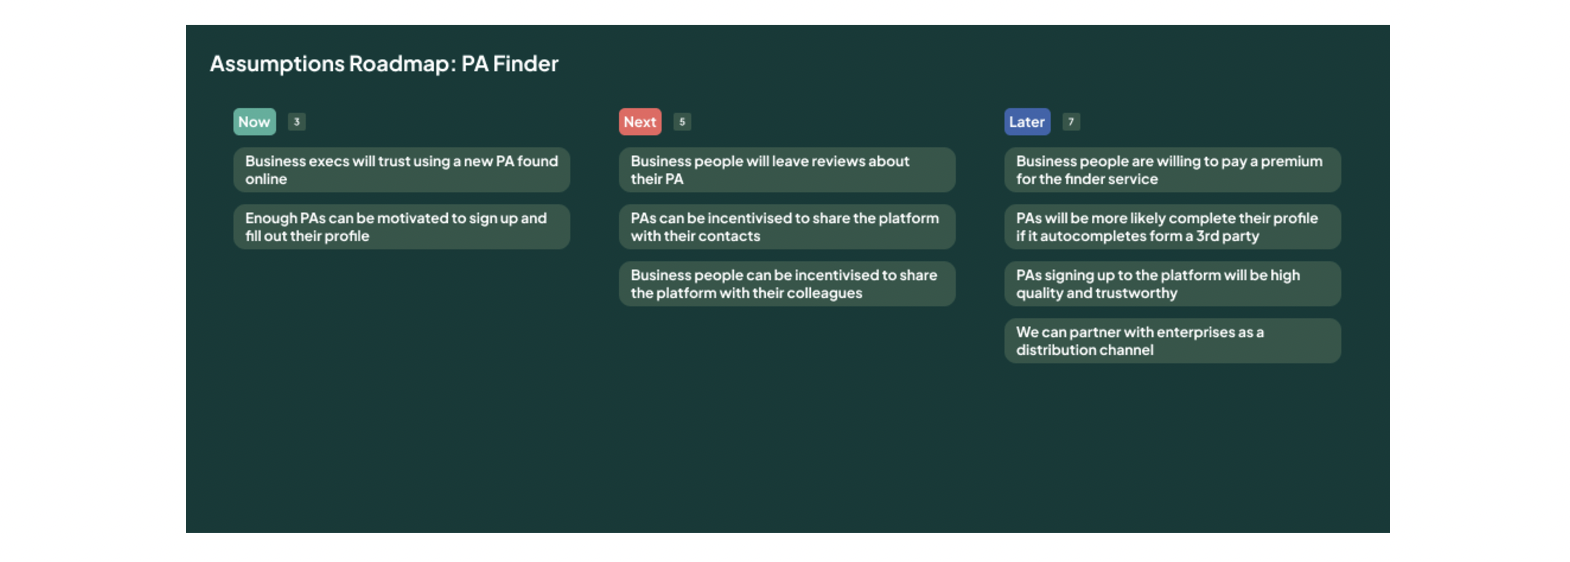
Taking our PA Finder app as an example, our ‘Now’ column might have something like: ‘Business execs will trust using a PA found online’. We might also attach OKRs to this in order to measure effectiveness, but that’s for another post.
Adopting an experimental mindset
By now, we’re sure who our customer is, we have clear evidence what problems they have and what the opportunities exist and we’ve tested potential solutions with increasing certainty as to whether they are desirable for customers. We’ve then distilled all of this down into a product strategy and high level roadmap to show how we’ll realise it.
This process doesn’t need to take months and it shouldn’t – all of the experiments described above can be done quickly and cheaply. As a rough guide, in 6 weeks you should be in a place where you are ready to start building your first iteration in earnest.
The build phase should continue this spirit of experientation: it should be a fast (again, 6 weeks max) experiment, testing the most important hypotheses in our roadmap. The aim here is to get working software into our customers’ hands quickly, so we can continue to learn as we build the next iteration.
Continuous Discovery
Although this guide has been presented in a linear way, this is a process that should be repeated constantly if it is to have any value. As you develop your product, you should continue to conduct experiments, big and small, in order to continue to learn about what customers value and what they don’t.
You’ll find that parts of the product strategy and roadmap were wrong and therefore these documents should be constantly reviewed and updated as you learn. We call this ‘Continuous Discovery’ and you can learn more about it in Teresa Torres’ book, Continuous Discovery Habits.